Creating Turnaround EDI Documents
A turnaround EDI document is a reply to a received EDI document. For example, let's assume for a moment that your trading partner sends you purchase orders and in response, they require you to return invoices. Because purchase orders and invoices share much of the same information, Liaison Athena provides you with a TPK that lets you base your invoice on the original purchase order.
When you create a turnaround document, Athena pulls all relevant information from the original document and places it in your reply. This saves you time and potential rekeying errors.
To create a turnaround EDI document…
- Open or highlight the EDI document you would like to reply to.
- Click the Reply icon and select the type of reply you are creating from the context menu that appears. There may only be one reply type available, several, or none; it's completely dependent on the TPK that governs the document you are replying to.
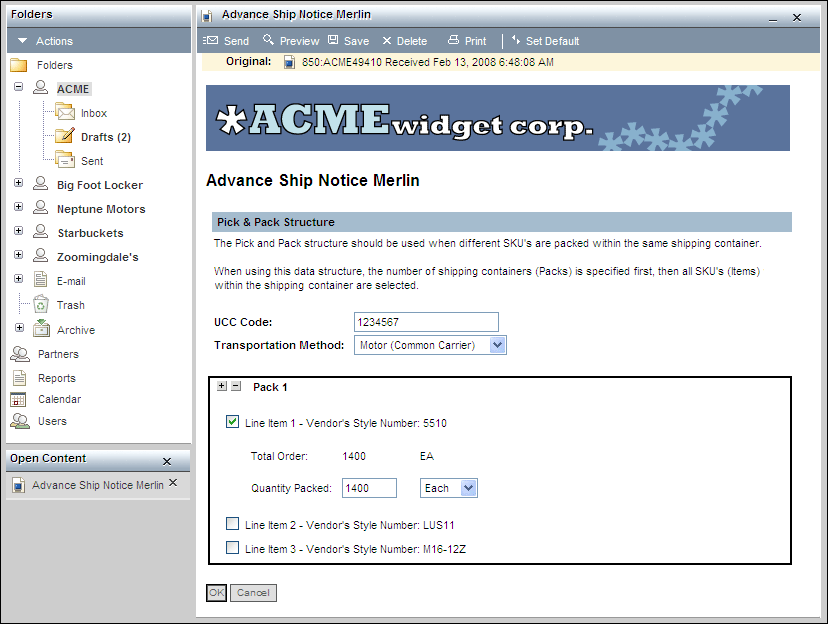
- Athena provides a transaction entry screen that prompts you for the specific types of information that your trading partner requires for the document type you are creating, as shown next. Fill in the required and optional information. Required fields display in bold text; they are required because your trading partner has deemed them mandatory.

- When you are finished filling in the fields on the screen and have verified that all data is correct, you can send, preview, or save the new document:
- Click the Send icon located at the top of the data entry screen to send the document to your trading partner immediately. When you attempt to send an EDI document, Athena verifies that all required fields are filled in and that all data has been formatted correctly. If either of these is not true for the document you have created, error messages display at the top of the entry screen and will you not be able to send the document until all errors have been corrected. Clicking one of these error messages automatically places your cursor in the field with the missing or erroneous data. When you successfully send a document, Athena saves a copy of the completed document in your Sent folder.
- Click the Preview icon to convert the form to a display-only format similar to the format used to display received EDI transactions. As with sending, when you attempt to preview an EDI document, Athena verifies that all required fields are filled in and that all data has been formatted correctly. If either of these is not true, error messages display at the top of the entry screen. Clicking one of these error messages automatically places your cursor in the field with the missing or erroneous data. You will not be able to preview an EDI document until all errors have been resolved.
- Click the Save icon to update the copy of the current document that Athena has saved to your Drafts folder. After a transaction is saved, you can either continue working on it or access it later from your Drafts folder and update it as needed.
Note: To make data entry easier, Athena offers you the ability to set default values for many of the fields in the form. You can learn more about this feature in the section titled Setting Field Defaults.
Note: As soon as you open the main data entry screen (step 3 above), Athena automatically saves a copy of the transaction to your Drafts folder. Even after you send the transaction, an updateable version remains in your Drafts folder and is available for you to modify and resend in the future if required.